
AI Cartoon Generator Guide: Boost Quality with Photo Prep, Background & Lighting Fixes
Have you ever uploaded a favorite photo to an AI cartoon generator, only to get a result that looks... a little off? Maybe the lines are blurry, the colors are muddy, or an object in the background has merged strangely with your face. It's a common frustration, but the solution is surprisingly simple. The secret to a stunning, professional-grade cartoon isn't just in the AI—it's in the photo you give it.
Mastering a few simple photo preparation techniques can dramatically improve the quality and artistic appeal of your AI-generated images. By giving the AI a clean, clear, and well-lit source file, you empower it to create the incredible results you're looking for.
This guide will walk you through the essential steps of photo preparation, from background removal to lighting fixes. Once you've perfected your picture, you can create amazing cartoons with confidence, knowing you’re set up for success every time.

Why Photo Preparation Matters for Improving AI Cartoon Quality
Artificial intelligence works on a simple principle. AI mirrors what you give it. A messy photo means a cartoon blob out. Always start clean! Think of it like giving an artist a blurry, dark reference photo and asking them to paint a detailed portrait—they can only do so much with poor material.
Preparing your photo beforehand is the single most effective way to guide the AI toward a high-quality result. By cleaning up the visual "noise," you tell the AI exactly what to focus on, ensuring it captures the essence of your subject perfectly.
How Photo Flaws Affect AI Cartoon Output
AI analyzes photos by detecting patterns, edges, and lighting changes. These cues help it map your subject’s shape. Common photo flaws can disrupt this process, leading to disappointing results:
- Blurry or Low-Resolution Images: If the image is pixelated, the AI struggles to identify fine details like eyes, hair strands, and facial expressions. This often results in a generic or distorted cartoon face.
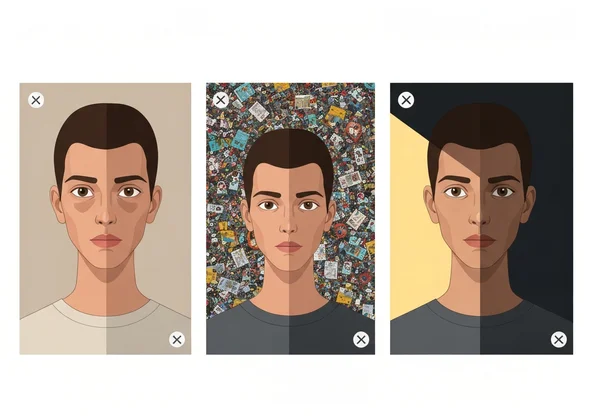
- Busy Backgrounds: A cluttered background with many objects, patterns, or people can confuse the AI. It might accidentally merge a background element with the subject or misinterpret the main focus of the image.
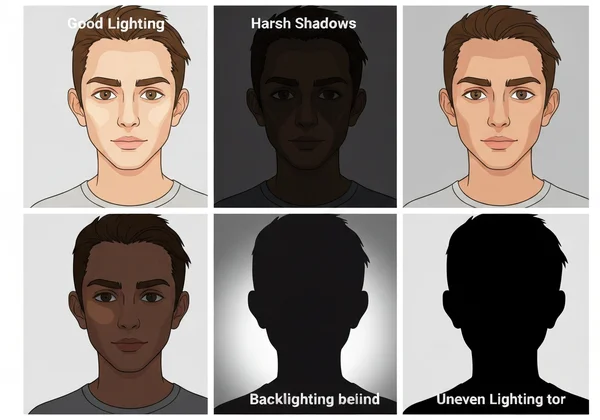
- Poor Lighting: Harsh shadows can be misinterpreted as part of the subject's features, while flat lighting can make the final cartoon look dull and lifeless.
Common Photo Problems That Confuse AI
Three main issues consistently cause problems for AI cartoon generators. By learning to spot and fix them, you can significantly improve your outcomes.
-
Harsh Shadows: A strong shadow across a face can create unnatural lines or dark patches in the cartoon version, making the person look completely different.
-
Visual Clutter: A bookshelf, a crowd of people, or a patterned wallpaper behind you competes for the AI's attention. This often leads to strange artifacts in the final image.
-
Uneven Lighting: When one side of a face is brightly lit and the other is in shadow, the AI might struggle to create a balanced and aesthetically pleasing cartoon.
Mastering Background Removal for Clean AI Cartoon Conversions
One of the most powerful preparation steps is removing the background entirely. This technique instantly eliminates distractions and forces the AI to concentrate solely on your subject, whether it's a person, a pet, or an object.
Why a Clean Background Elevates Your Cartoon Image
A clean or transparent background offers two major benefits. First, it ensures the AI doesn't get confused by irrelevant visual data. This leads to cleaner lines, more accurate features, and a more faithful cartoon transformation.
Second, an image with a transparent background is incredibly versatile. You can easily place your new cartoon avatar on different colored backgrounds, use it in presentations, add it to video thumbnails, or integrate it into larger design projects without any awkward white boxes around it.
Free Tools & Techniques for Effortless Background Removal
You don't need to be a graphic designer or own expensive software to remove a background. Several excellent and free online tools can do it for you in seconds. Some popular and user-friendly options include:
- Remove.bg: A simple, web-based tool dedicated to one task: removing backgrounds from photos with people in them.
- Canva: The free version of this popular design tool includes a user-friendly background remover.
- Photopea: A free, web-based photo editor that functions like a lite version of Photoshop, offering more advanced tools for manual background removal if needed.
Step-by-Step: Preparing Your Photo's Background for AI
Preparing your photo with a clean background is a quick, three-step process that makes a world of difference.
-
Choose Your Tool: Navigate to a free background removal website like Remove.bg.
-
Upload Your Image: Click the "Upload Image" button and select the photo you want to convert. The tool will automatically detect the subject and erase the background.
-
Download and Use: Download the resulting image, which will be a transparent PNG file. This is the perfect file to upload to our AI cartoon generator for the best possible conversion.

Lighting Correction for AI Cartoons
Lighting is the soul of a photograph. It shapes faces, creates mood, and defines details. For an AI, good lighting is a clear roadmap to understanding your subject’s features. Fix lighting first. Bright, balanced photos help AI create vivid, true-to-life cartoons.
The Critical Role of Lighting in Cartoon Aesthetics
Think about your favorite animated movies. The characters are defined by clear, deliberate lighting that highlights their expressions and forms. AI cartoon generators try to replicate this. When your source photo has balanced, even lighting, the AI can more easily translate your facial structure into a defined cartoon style. Conversely, dark, shadowy, or overexposed photos hide the very details the AI needs to create a great image.
Simple Lighting Adjustments Using Free Photo Editors (e.g., GIMP, Photopea)
Fixing basic lighting issues is easier than you think. Most computers and smartphones have built-in photo editors with simple sliders. For more control, free tools like GIMP or Photopea are excellent choices.
Focus on these three simple adjustments:
- Brightness/Exposure: If your photo is too dark, slightly increase the brightness until you can clearly see the details in the darker areas.
- Shadows: Many editors have a specific "Shadows" slider. Increasing this can lighten the darkest parts of your image without overexposing the rest.
- Contrast: A slight boost in contrast can make the edges and features of your subject stand out more, giving the AI clearer lines to follow.
Avoiding Common Lighting Pitfalls Before AI Conversion
The best approach is to start with a well-lit photo from the beginning. When taking or choosing a photo for cartoon conversion, try to avoid:
-
Direct, Harsh Sunlight: This creates hard shadows. Opt for photos taken in the shade on a sunny day or near a window with indirect light.
-
Strong Backlighting: Avoid taking a photo with a bright light source (like the sun or a lamp) directly behind the subject. This will create a silhouette and hide facial details.
-
Dappled Light: Light filtering through tree leaves can create distracting spots of light and shadow on the subject's face.
Your Essential Pre-Conversion Photo Prep Checklist
You're almost ready to create the perfect AI cartoon. Before you upload your photo, run through this final checklist to ensure you've covered all the bases for a high-quality result.
Optimizing Resolution and Aspect Ratio for AI Cartoon Generators
Always start with the highest-resolution photo you have. A sharp, clear high-resolution photo provides more data for the AI to work with, resulting in a more detailed and refined cartoon. Avoid using blurry screenshots or heavily compressed images.
Also, consider your final goal. If you're making a profile picture for social media, you might want to choose a 1:1 (square) aspect ratio in the generator. If it's for a phone wallpaper, a 9:16 ratio would be better.
Cropping Strategies for Focused AI Cartoon Outputs
Cropping is a simple way to remove distracting elements and direct the AI's focus. For portraits, a "head and shoulders" crop is often the most effective. Cut out any unnecessary background space or other people at the edges of the frame. The more prominent your subject is in the photo, the better the AI will be at capturing their likeness.
Do's and Don'ts: Best Practices for AI Cartoon Input Photos
Here is a quick summary of best practices to remember before you try our AI cartoon generator.
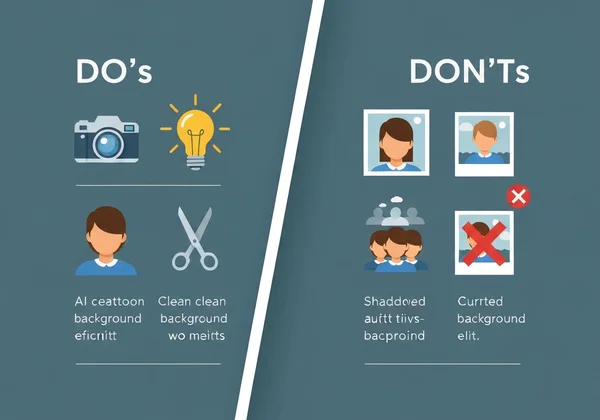
Do:
- Use a clear, high-resolution photo.
- Ensure the subject's face is well-lit and clearly visible.
- Choose a photo with a simple, uncluttered background (or remove it).
- Crop the image to focus on the main subject.
Don't:
-
Use blurry, pixelated, or dark photos.
-
Use photos where the face is covered by hair, hands, or deep shadows.
-
Upload group photos where the faces are small and lack detail.
-
Use photos with busy, distracting backgrounds.
Elevate Your AI Cartoons: The Power of Preparation
Think of AI cartoon generation like a dance: you lead with a great photo, and the tech follows with artistic flair. While the AI provides the magic of transformation, you provide the quality source material it needs to succeed. By taking just a few extra minutes to prepare your photo—by cleaning the background, correcting the lighting, and cropping for focus—you can elevate your results from good to breathtaking.
Now that you know the professional secrets to perfect photo prep, you are ready to unleash your creativity. Take your best, newly optimized photo and discover what's possible.
Give your next cartoon a pro-tier glow-up – upload your prepped photo and watch the magic happen! Start creating now and transform your pictures into stunning works of art!
Frequently Asked Questions About AI Cartoon Photo Preparation
What kind of photos work best for an AI cartoon generator?
The best photos are high-resolution, well-lit headshots or upper-body portraits where the subject's face is clearly visible and unobstructed. A photo with a plain, neutral, or removed background will almost always produce a superior result.
Can AI automatically fix bad lighting or backgrounds during conversion?
While some advanced AI tools have minor correction capabilities, they are not a substitute for good photo preparation. The AI's primary job is to apply an artistic style, not to fix fundamental flaws in a photo. Providing a clean, well-lit image gives the AI the best possible chance to create an accurate and beautiful cartoon.
How do I improve the overall quality of my AI-generated cartoon?
The best way to improve quality is to follow the steps in this guide: start with a high-resolution image, remove any distracting background elements, adjust the lighting to be even and clear, and crop to focus on your subject. Using a powerful and well-trained our AI tool with your prepared photo will yield the highest quality results.
Are there free tools I can use for photo preparation before using an AI cartoon generator?
Absolutely! There are many excellent free tools available online. For background removal, sites like Remove.bg are fantastic. For lighting and cropping adjustments, free web-based editors like Photopea or desktop software like GIMP provide all the power you need without any cost.